If you’ve ever streamed on Twitch or YouTube, you know how often viewers spam “what song is this?” in chat. Adding a live display of your currently playing Spotify track fixes this instantly, boosts viewer engagement, and gives your stream a polished, professional feel. As the most popular free, open-source broadcasting tool, obs studio makes adding this feature simple, with options ranging from ready-made widgets to fully custom displays.
In this guide, we’ll break down 3 reliable methods to add a spotify widget obs to your stream, build a custom overlay spotify obs that matches your brand, and explain how to set everything up for both desktop OBS and lightweight obs studio online platforms. Whether you’re a brand-new streamer or a seasoned creator, there’s a solution that fits your skill level and setup.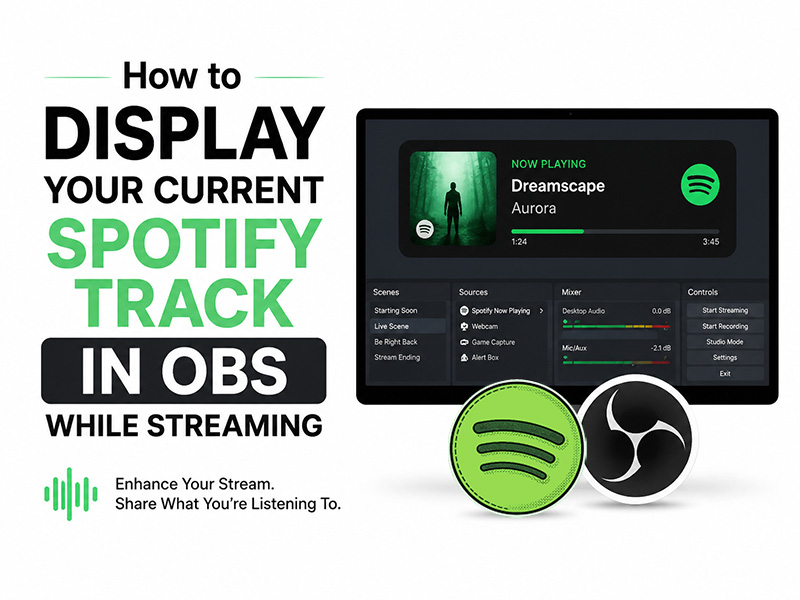
Prerequisites Before You Start
You don’t need fancy equipment to add a Spotify now-playing display. All you need is:
- An active Spotify account (both Free and Premium plans work)
- Obs studio installed on your Windows, Mac, or Linux computer
- A stable internet connection for browser-based widget methods
- Basic familiarity with adding and arranging sources in OBS
Important note: Displaying track names does not grant you copyright permission to play music on stream. Always ensure you have proper licensing or use royalty-free music to avoid DMCA strikes.
Method 1: Add a Spotify Widget OBS via Browser Source
This is the most popular and beginner-friendly method. It uses a third-party web-based spotify widget obs tool that pulls your live playback data from Spotify, then displays it as a customizable overlay in OBS via a browser source. No extra software or plugins required.
Step-by-Step Setup
1. Choose a Spotify Widget Generator
There are dozens of free, reliable tools like NowPlaying for Spotify, StreamSpell Widget, and OBS-Overlay.com. All work the same way: they connect to your Spotify account with read-only access to pull your current track, and generate a unique URL for your widget.
2. Connect Your Spotify Account
On your chosen widget site, click “Connect Spotify” and log in with your account. The tool will only request permission to view your currently playing content; it cannot modify your playlists, library, or account settings.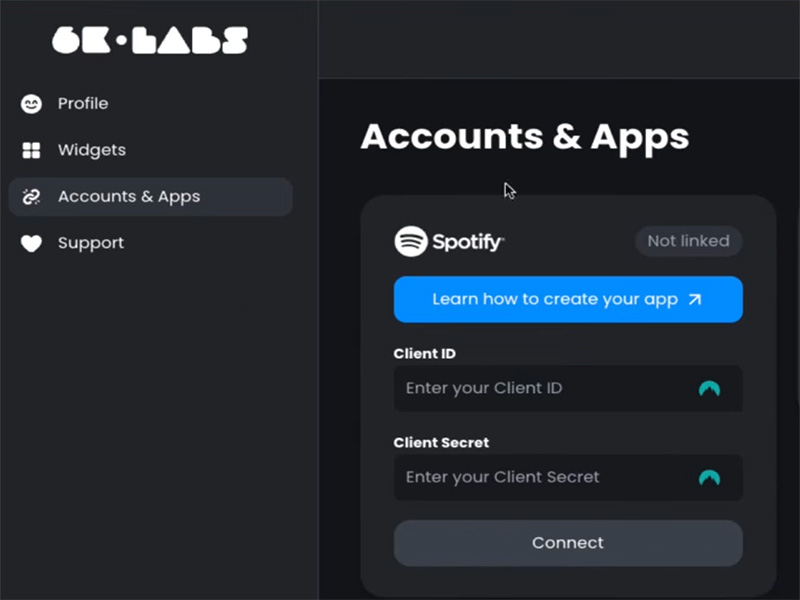
3. Customize Your Overlay Design
This is where you build an overlay spotify obs that matches your stream brand. Most tools let you adjust:
- Text font, size, and color
- Whether to show album art, track name, artist name, and progress bar
- Background style
- Animation effects for track transitions and scrolling long song titles
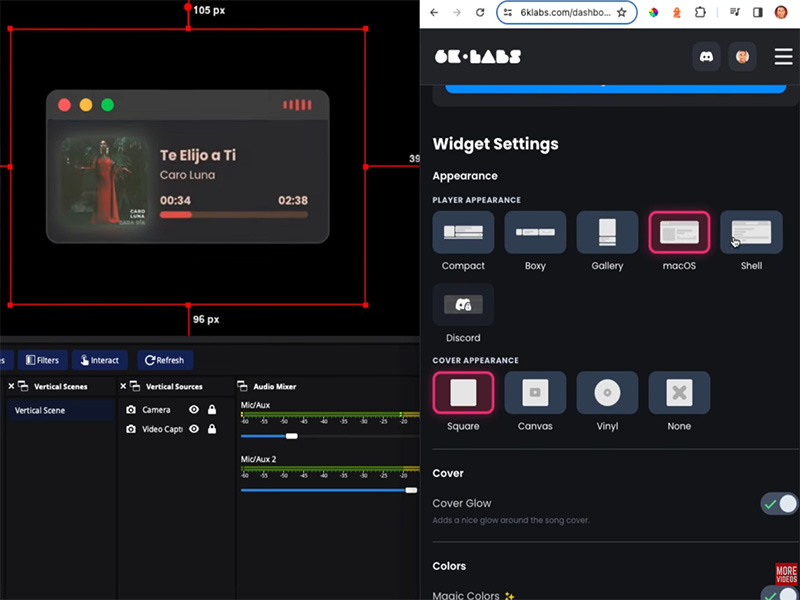
Preview your changes live until the design fits your stream’s aesthetic.
4. Copy Your Unique Widget URL
Once you’re happy with the design, copy the generated browser source URL. Keep this link private, because it’s tied to your Spotify account.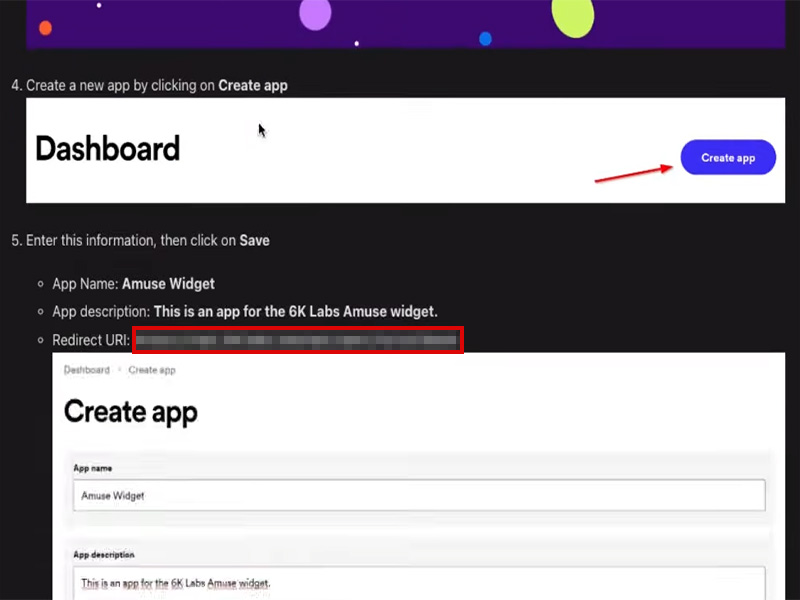
5. Add the Widget to OBS Studio
- Open obs studio and go to the Sources panel
- Click the `+` icon and select Browser from the list
- Name the source “Spotify Now Playing” and click OK
- Paste your copied widget URL into the URL field
- Set the width and height to match your widget’s recommended dimensions
- Check “Refresh browser when scene becomes active” to prevent stale display
- lick OK, then drag and resize the widget to your preferred corner of your stream canvas
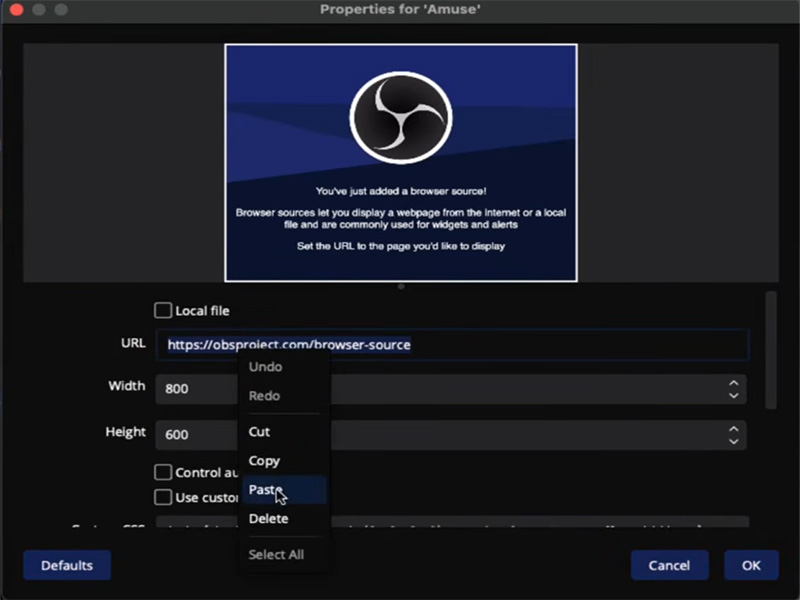
This method works seamlessly for both desktop obs studio and nearly all obs studio online platforms, since browser sources are a standard feature across almost all streaming software.
6. Pros & Cons
Pros:
- No extra software or plugins to install
- Fully customizable to match your brand
- Works on all operating systems
- Updates in real time as you change tracks
Cons:
- Requires an active internet connection
- Relies on third-party tool uptime
- Fewer advanced options than dedicated plugins
Method 2: Use a Dedicated OBS Plugin for Advanced Overlay Spotify OBS Control
If you want more reliability, deeper customization, and offline functionality, a dedicated OBS plugin is the best choice. Tools like Web Now Playing Redux are built specifically for OBS, connect directly to your Spotify desktop or web player, and give you full control over every element of your overlay spotify obs.
Step-by-Step Setup
1. Download and Install the Plugin
Get the latest version of Web Now Playing Redux from the official OBS Plugin Portal or the project’s GitHub page. Choose the version that matches your installed obs studio release, then run the installer and restart OBS when prompted.
2. Configure the Spotify Connection
- In OBS, go to Tools > Web Now Playing Settings
- Under Player Source, select Spotify Desktop or Spotify Web Player
- Follow the on-screen prompts to authorize the plugin with your Spotify account
- Use the settings menu to toggle which elements appear: album art, track title, artist name, progress bar, play/pause indicator, and more
3. Add the Widget Source to Your Scene
- In the Sources panel, click `+` and select Web Now Playing
- Name the source and click OK
- Use the source properties to adjust sizing, positioning, and styling
- For advanced customization, you can add custom CSS to match your exact brand design
4. Test with Live Playback
Play a track on Spotify and confirm the widget updates in real time within your OBS canvas. You can drag it to any corner and resize it to fit your layout.
5. Pros & Cons
Pros:
- More reliable and stable than browser-based widgets
- Advanced customization and custom CSS support
- Works offline once configured
- Lower system resource usage than extra browser tabs
Cons:
- Requires plugin installation and OBS restarts
- Slightly steeper learning curve for advanced styling
- Compatibility depends on OBS version updates
Method 3: Local Text File Method
If you stream offline, have unstable internet, or prefer not to authorize third-party tools, you can use a lightweight local tool to output your current track to a text file, then display that text directly in obs studio. This is the most minimal option and works completely offline.
Step-by-Step Setup
1. Download a Track Display Tool
Grab a free, lightweight program like Snip or Spotify Now Playing Text Output. These tools run in your system tray, detect Spotify playback, and write the current track info to a plain text file on your computer.
2. Configure the Output Settings
Open the tool and go to settings. Choose your output file location, set the display format (e.g., `Track Name – Artist`), and adjust update speed. Most tools let you toggle whether to show album, duration, or other extra info.
3. Add a Text Source in OBS Studio
- In the Sources panel, click `+` and select Text (GDI+)
- Name the source and click OK
- Check the box labeled “Read from file”
- Click Browse and select the text file generated by your track tool
- Customize the font, size, color, and outline to match your stream overlay
- Click OK and position the text on your canvas
4. Pros & Cons
Pros:
- 100% offline — no internet connection needed
- No third-party account authorization required
- Extremely low system resource usage
- Simple, clean text display for minimal overlays
Cons:
- No album art or progress bar by default
- Requires a small background tool running
- Limited design customization compared to widgets
Pro Tips for a Polished Overlay Spotify OBS
A great Spotify widget doesn’t just show track names and it fits seamlessly into your stream design. Follow these tips for a professional look:
- Match your brand palette
Adjust text colors, accents, and backgrounds to match your logo, stream overlays, and overall brand identity. Many widgets let you use hex color codes for exact matching.
- Pick an unobtrusive position
Place your spotify widget obs in a bottom corner where it won’t cover gameplay, your webcam, or chat. Avoid the top of the screen, where most platforms place stream UI elements.
- Use subtle animations
Enable smooth fade transitions when tracks change, and turn on scrolling for long song titles. Keep animations slow and subtle; flashy effects will distract viewers.
- Add a semi-transparent background
If you stream over busy gameplay footage, add a dark, semi-transparent bar behind your widget text. This ensures readability no matter what’s happening on screen.
- Test across all scenes
Add your widget to every scene you use (gameplay, just chatting, starting soon, etc.) and confirm it looks consistent across all layouts.
Troubleshooting Common Issues
Even with simple setups, small problems can pop up. Here are fixes for the most frequent issues:
- Widget not updating when tracks change
Refresh the browser source in OBS, double-check your internet connection, and re-authorize the widget tool with your Spotify account. For plugins, restart both Spotify and OBS.
- Widget doesn‘t appear on stream
Make sure the source is visible in your OBS sources list, check that the source is layered above your background/game capture, and verify the widget URL was pasted correctly.
- Long track names get cut off
Widen the browser source, enable text scrolling in the widget settings, or adjust the font size to fit longer titles.
- Plugin can‘t detect Spotify
Ensure Spotify is updated to the latest version, restart both apps, and confirm you selected the correct player source in the plugin settings.
Final Thoughts
Adding a live Spotify track display is one of the easiest, highest-impact upgrades you can make to your stream. It cuts down repetitive chat questions, makes your stream feel more professional, and lets your viewers discover new music alongside you.
For beginners, the browser-based spotify widget obs method is the fastest way to get started, and it works perfectly with both desktop obs studio and most obs studio online platforms. If you want more control and reliability, upgrade to a dedicated plugin down the line.
Whichever method you choose, take a minute to customize your overlay spotify obs to match your brand. This small design touches make a huge difference in how polished your stream feels.